Saturday, December 29, 2012

Lightly Boozy Pina Colada Bread for #TwelveLoaves


Seeing that this is a month of celebration, it was not a huge surprise to learn that the theme for this month's Twelve Loaves challenge was... booze.

Yup - the idea was to bake a bread, yeasted, sourdough, quick or other, somehow incorporating wine, spirits or some other alcohol product.

Fun!

Except that we don't really drink much in our house, so I was totally not quite sure where to start with this one. So I waited. And waited. And almost missed out. Until pineapples went on sale at the food store. And as I was cutting one up for a snack, inspiration finally hit.


On a cold, snowy, day-after-Christmas afternoon, what could be better than a tropical vacation? And what is more tropical than a pina colada?

Boom.


Pina colada quick bread. Don't hold the rum. Or the fun paper drink umbrella.

A few google searches later and I settled on this recipe, but made a couple of changes. For starters, instead of all of those extracts, I used a quarter cup of vanilla rum. And secondly, I chopped up my fresh pineapple rather than using the canned, crushed variety. And finally, rather than using all white sugar, I mixed it up and used some brown sugar, too. Oh, and I omitted the maraschino cherries because I am not a fan.


And it worked out deliciously.

The breads stuck to the pans way more than I'd have liked, which made them a little less presentable than I'd have liked, but what it lacked in beauty it made up for in flavor. Each bite was a little taste of the tropics and everyone in the house loved it.


Pina Colada Bread
(slightly adapted from Quick Bread Recipes)

3 cups all-purpose flour
1 teaspoon salt
1 teaspoon baking soda
1 teaspoon cinnamon
4 eggs
1 1/4 cups oil
1 1/2 cups granulated sugar
1/2 cup brown sugar
1/4 cup vanilla rum
1/4 cup pineapple juice
1 cup fresh pineapple, chopped small
1/2 cup flaked coconut

Preheat oven to 350 degrees F.
Grease and flour well two 7 x 4-inch loaf pans.
In a large bowl, sift together flour, salt, baking soda and cinnamon and set aside.
In a separate bowl, lightly beat the eggs. Stir in oil and sugars. Add rum and pineapple juice.
Add egg mixture to dry ingredients and mix just until ingredients are moistened.
Gently fold in the chopped pineapple and coconut. Do not stir too much or bread will be heavy.
Pour into prepared loaf pans.
Bake for 45 to 50 minutes or until a wooden pick inserted comes out clean.
Let cool in pan for 10 minutes before removing from pans.

Enjoy!

Thursday, December 27, 2012

December Daring Bakers' Challenge - Panettone

Happy Holidays! I hope that, whoever you are, wherever you are and whatever you celebrate, you have had a wonderful year, a wonderful month and a wonderful celebration of life, family and the joys they bring.

In that frame of mind...

The December 2012 Daring Bakers’ challenge was hosted by the talented Marcellina of Marcellina in Cucina. Marcellina challenged us to create our own custom Panettone, a traditional Italian holiday bread!

I was so excited to read this challenge. I have never even tasted panettone before, but I have always been so curious about it. I see the boxes pop up in the stores around November of each year and I am always just... curious! So when I read the challenge, I couldn't wait to get started.

But the recipe is pretty long. And involved. And requires a not-insignificant amount of time and patience.

But I was excited right then!!

So I did the next best thing. I googled and found a quicker recipe for panettone so that I could at least get started.

The dough for panettone is an enriched dough, with plenty of butter and eggs. In this recipe, an overnight starter (called a biga) is combined with all of the other dough ingredients and mixed together in a stand mixer.


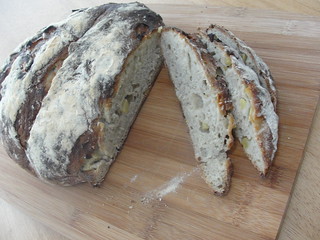
The dough then rises for an hour, is kneaded once more with whatever mix-ins you chose, and is then shaped and allowed to rise again.  Now, here you will notice two major differences between this and what you normally think of as a panettone. First, the mix-ins that I chose - usually it is a combination of fruits and candied peels. I chose mini chocolate chips and a sprinkle of cinnamon. Second, the shape. A traditional panettone is a tall, round bread baked in a special paper. This recipe calls for the bread to be baked in a tube or bundt pan.


The result was a delicious bread - a little dry, but nice and flavorful and so very easy to eat.


But I wasn't done. I really, really wanted to try the challenge recipe, and to go as traditional as I could, and I knew, because she is awesome, that Marcellina would have chosen a really great recipe for us. So I made that one, too.

While it is probably possible to complete the whole thing in one day, you'd have to start very early, and would probably be baking until very late at night.  So I decided to split it into two days.  The first day I prepared the base of the dough.  The dough comes together similarly to the easier version, in that it starts with a sponge (which is very similar to the biga used in the other recipe, just a higher hydration level), but involves more eggs, much more butter, and much more patience.  And the dough is so much softer and silkier than the previous one. I knew I'd made the right choice trying this version.  The dough went into the fridge overnight and I went to bed very excited.

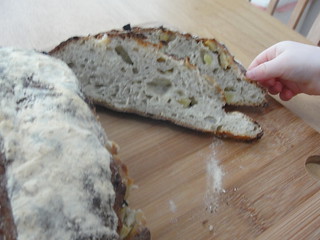
As far as the filling, I asked daddy to pick up some dried fruits, and he chose the beautiful rainbow of papaya, mango, pineapple and kiwi.


While the dough came back up to temperature after its cool rise, I chopped the fruits, added some raisins and dried cranberries, and soaked them in orange juice.


Once the dough was ready, it was time to put everything together.  With a little bit of help...


Now, I couldn't find panettone papers, so I decided to try these cool no-pan-required, oversized muffin liners for my panettones.


They worked out... okay... The only problem was that the dough grows quite a bit. And panettone papers guide the dough so that it grows nice and tall.

The muffin liners... didn't.

So they grew out more than up...


But despite the fact that they were not the traditional shape, they were absolutely delicious.  The bread itself is so soft and rich and deliciously wonderful, and the tropical fruit we used was so fun.


Next I want to try a sourdough version, to go even more traditional!

Marcellina, I can't thank you enough for this challenge. I can't wait to keep working on it. I hope that next holiday season I can make the real deal!

To see the other amazing and beautiful panettoni (panettones?) baked up this month, check them out here.


Panettone
(from December Challenge)

For the Sponge
2¼ teaspoons active dry yeast
1/3 cup warm water
½ cup unbleached all purpose flour

Mix the yeast and water in a small bowl and allow to stand until creamy, about 10 minutes or so.
Mix in the flour.
Cover with plastic wrap and allow to double in size, about 20 to 30 minutes.


For the First Dough
2¼ teaspoons active dry yeast
3 tablespoons warm water
2 large eggs, at room temp
1¼ cup  unbleached all-purpose flour
¼ cup sugar
½ cup (1 stick) unsalted butter, at room temp

In the bowl of your mixer, mix together the yeast and water and allow to stand until creamy. Again, about 10 minutes or so.
With the paddle attached, mix in the sponge, eggs, flour, and sugar.
Add in the butter and mix for 3 minutes until the dough is smooth and even.
Cover with plastic wrap and allow double in size, about 1 – 1 ¼ hours


For the Second dough
2 large eggs
3 large egg yolks
2/3 cup sugar
3 tablespoonshoney
1 tablespoon vanilla extract
1 teaspoon lemon essence/extract
1 teaspoon orange essence/extract
1 teaspoon salt
1 cup (2 sticks) unsalted butter, at room temp
3 cups unbleached all-purpose flour; plus up to 2/3 cup additional for kneading

With the paddle attachment, thoroughly mix in the eggs, egg yolks, sugar, honey, vanilla, essences/extracts, and salt.
Mix in the butter until smooth.
Add the flour and slowly incorporate.
At this stage the dough will seem a little too soft, like cookie dough.
Replace the paddle with the dough hook and knead for about 2 minutes.
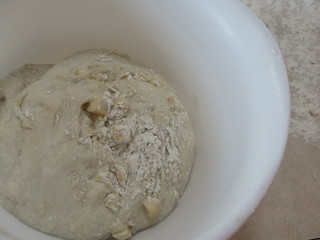
Turn out the dough and knead it on a well-floured surface until it sort of holds its shape.
Don’t knead in too much flour but you may need as much as 2/3 cup (I needed the whole 2/3 cup - the dough is very soft and sticky!). Be careful, though, as the excess flour will affect the finished product.

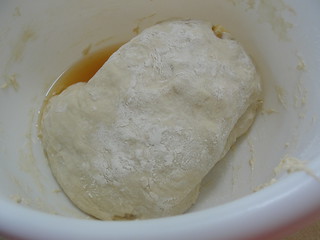
Oil a large bowl lightly, plop in your dough and cover with plastic wrap.
Now we need to let it rise until it has tripled in size. There are two ways to go about this.
Rise in a warm place for 2 – 4 hours.
Or find a cool spot (64°F -68°F) (18°C – 20°C) and let it  rise overnight
Or rise for 2 hours on your kitchen bench then slow the rise down and place in the refrigerator overnight. If you do this it will take some time to wake up the next morning. This is the method I chose.


For the Final dough
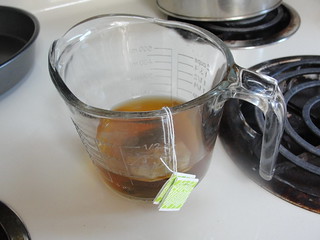
2 1/2 cups assorted dried fruit, chopped, soaked in juice (or soaked in the alcohol of your choice!)

If you had your dough in the refrigerator overnight, remove it and set it (still covered) on the counter to warm up. This may take a couple of hours, since the butter in the dough will have stiffened as it cooled.
Soak the dried fruits in your selected liquid for 30 minutes before the end of the first rise. Drain and pat dry with paper towels.
Now take your dough and cut it in half (the recipe is enough to make two panettoni).
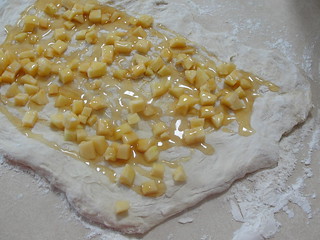
Press out one portion of dough into an oval shape.
Sprinkle over one quarter of the filling and roll up the dough into a log.
Press out again into an oval shape and sprinkle over another quarter of the filling.
Roll into a log shape again.
Repeat with the second portion of dough.
Shape each into a ball and slip into your prepared pans, panettone papers or homemade panettone papers.
Cut an X into the top of each panettone and allow to double in size.
Rising time will vary according to method of first rise. If it has been in the refrigerator it could take 4 hours or more. If it has been rising on the kitchen bench in a warm place it should be doubled in about 2 hours.

When you think your dough has only about 30 minutes left to rise preheat your oven to moderately hot 400°F.
Just before baking carefully (don’t deflate it!) cut the X into the dough again and place in a knob (a nut) of butter.
Place your panettoni in the oven and bake for 10 minutes
Reduce the heat to moderate 350°F and bake for another 10 minutes
Reduce the heat again to moderate 325°F and bake for 30 minutes, until the tops are well browned and a skewer inserted into the panettone comes out clean.
Cooling your panettone is also important. If you have use papers (commercial or homemade) lie your panettoni on their side cushioned with rolled up towels. Turn gently as they cool. If you have used pans cool in the pans for 30 minutes then remove and cushion with towels as above.

Enjoy!


Saturday, December 22, 2012

Lemony Mint Salad Dressing

I recently had the opportunity to review a cookbook for The Daring Kitchen. The book, An Edible Mosaic, by Faith Gorsky, is a truly beautiful book imparting the author's learned knowledge and love for Middle Eastern food.

The first recipe that I tried was for Lemony Mint Salad Dressing. While there were many recipes that I wanted to (and subsequently did...) make, I knew I'd be starting with this one because half of the recipes that caught my eye throughout the book mentioned it. As the dressing for a chickpea salad. For a cabbage salad.
For a beet salad.  For an eggplant salad.  They all looked delicious. And they all called for Lemony Mint Salad Dressing.

The best part about this dressing is how easy it is to make. And how fresh it is.

Some lemons, some garlic and some fresh mint, which I was lucky enough to still have hiding in the garden. 


Squeeze a lemon, add some garlic that's been crushed with salt, then whisk in a thin drizzle of olive oil.


Add your fresh mint...


...and you're good to go!

And guess what - it goes great on everything! Aside from the recommended applications, I also tried the dressing on "regular" salad (mixed greens and cherry tomatoes), and even tried it over pasta for a light lunch!


Super tasty!

And if you want a peek as to what it's like trying to have a food photo shoot with a curious toddler around...


Yeah. Lots of little fingers in my photos.

I highly recommend checking out An Edible Mosaic. If you have any interest in, or even a bit of curiosity about, Middle Eastern food, this is definitely the book for you. To see my full review, check it out here.


Lemony Mint Salad Dressing
(from An Edible Mosaic)

1 clove of garlic, crushed with 1/4 teaspoon salt (I do not have a mortar and pestle, so rather than crushing my garlic with the salt, I minced it and used the side of the knife to crush the minced garlic with the salt, creating a coarse paste)
Juice of 1 lemon (about 3 tablespoons)
1/2 cup olive oil
1 tablespoon minced fresh mint leaves

Whisk together the garlic/salt mixture and the lemon juice. Whisk in the olive oil, drizzling the oil gradually into the lemon juice mixture, whisking continuously. Stir in the mint.

I stored my dressing in a mason jar in the fridge. It did separate a bit, and the olive oil solidified in the cold, so I simply removed the jar from the fridge a couple of hours before using it, then shook it vigorously before using.

Enjoy!

Thursday, December 20, 2012

Sourdough Surprises #9 - Cookies!

This can't be right. It can't be the day that we share our Sourdough Surprises results for the month. Because that means that there are only five days left before Christmas and I am so not ready!

Aside from the fact that the holidays are the perfect cookie-baking time of year (though, is there ever a bad time of year for baking cookies?), I had extra incentive to bake cookies. You see, I volunteered to be on the Staff Appreciation committee at little miss's elementary school. And last week they had a cookie day for the teachers. Each member of the committee baked enough cookies so that, when all was said an done, there would be enough for each staff member to take home two dozen delicious goodies. What a great idea!

What better way to offer variety than to make several sourdough varieties?


And may I mention, for a brief moment, how proud I am of that healthy starter you see up there? This month marks its one year anniversary and, despite a scare or two, it's still going strong!

Anyway, for my first variety, I chose to try these pumpkin spice cookies (thought I decided to forgo the sandwich filling aspect...).  My favorite part was seeing the rainbow array of spices.


The dough came together very easily, but felt a bit more like cake batter than cookie dough.


Which might explain why they baked up kind of cakey, too!


But they were light and delicious, and really captured the flavor of the season.


And, in case you were wondering, the froze beautifully - once they cooled completely, I carefully bagged up two dozen and popped them into the freezer until the day before the staff cookie day, and by morning they were perfect!

After the pumpkin spice cookies, I then made a batch of (regular, non-sourdough) gingerbread cookies, to go on the seasonable theme.

And then the coordinator of the Staff Appreciation day let us know that they might be a few dozen cookies short.

Well, hey - prefect opportunity for more sourdough cookies!  To change things up, I went for something different - these sourdough chocolate chip oatmeal cookie bars.  I figured I'd be able to get three dozen decent sized pieces from the batch.

And I was on a roll.

The dough came together beautifully, I spread it out nicely and evenly in my pan, and they smelled amazing as they baked.

And I thought I'd allowed them to cool completely before trying to cut them... but I guess they weren't totally set.

Because they kind of made a mess.


Umm... crumbly and totally not neat, share-able squares.

Thankfully, I was able to salvage two dozen squared from the middle of the pan.


And those non-presentable ones made for some super delicious snacking here at home.

And from what I understand, the teachers were thrilled with the variety of cookies provided, so I'm hoping that these were a hit!

I can't wait to see all of the delicious cookies you guys have made over this past month. So link up!


Sourdough Pumpkin Spice Cookies
(from The Chalk Board)


1/2 cup butter, softened
1 cup firmly packed brown sugar
2 eggs, beaten
1 cup sourdough starter
1 cup canned pumpkin
2 cups all-purpose flour
1 teaspoon baking soda
1/2 teaspoon salt
1/2 teaspoon ground cinnamon
1/4 teaspoon ground ginger
1/4 teaspoon ground nutmeg
1/8 teaspoon ground cloves
1/2 teaspoon baking powder
1 teaspoon vanilla

Preheat oven to 350 degrees.
Cream together butter and sugar until light and fluffy. Add egg, sourdough starter and pumpkin. Mix well. Combine flour with remaining dry ingredients and add to mixture. Mix until blended.
Drop by teaspoonfuls onto greased cookie sheet.
Bake at for 15 minutes or until done.
Cool on a rack until completely cool.


Sourdough Chocolate Chip Oatmeal Cookie Bars
(from The Manly Housekeeper)


1 cup (two sticks) unsalted butter
1 cup granulated sugar
1/2 cup packed brown sugar
2 eggs
1 cup sourdough starter (fed or unfed, doesn’t matter)
1 teaspoon vanilla
1/2 teaspoon baking soda
1 teaspoon salt
1 cup all-purpose flour
2 1/2 cups rolled oats
1 1/2 cups chocolate chips

Preheat the oven to 400 degrees F.
Cream together the butter and sugars. Beat on medium-high speed for 2 minutes. In a separate bowl, whisk together the flour, salt and baking soda and set aside.
Add the eggs and beat thoroughly. Then add the sourdough starter and vanilla. Mix thoroughly. Next, add the reserved dry ingredients. The dough will be fairly wet.
Add the rolled oats and chocolate chips and mix thoroughly. Spread out the dough onto a sheet pan (the one I use is 11×17 inches).
Bake for 20 minutes. Wait until the cookies are completely cool before cutting.

Enjoy!


Friday, December 14, 2012

December Daring Cooks' Challenge - Shepherd's Pie

Our Daring Cooks’ December 2012 Hostess is Andy of Today’s the Day and Today’s the Day I Cook! Andy is sharing with us a traditional French Canadian classic the Paté Chinois, also known as Shepherd’s pie for many of us, and if one dish says comfort food.. this one is it!

Ah,  shepherd's pie. I love shepherd's pie. It's comfort food at its best - a one-dish comfort food meal made up of comfort food components. It doesn't get much better than that.

Shepherd's pie is a layered dish, with meat (or non-meat protein...) on the bottom, some sort of vegetable, then a topping of mashed potatoes.

Andy gave us lots of freedom to create our own version of this dish, and as soon as I read the announcement, I knew what I wanted to do. You see, the challenge was announced about a week before Thanksgiving. And Thanksgiving is notorious for leftovers. Leftovers generally including protein (turkey), vegetables (green beans, sweet potatoes) and potatoes (sometimes even mashed!).  Sounds like the perfect foundation for a shepherd's pie!

Unfortunately, the only thing I actually had as a real leftover from Thanksgiving was turkey, as my in-laws host a beautiful Thanksgiving dinner and plan very well, specifically allowing for leftover meat to send home with their kids.  So I had to make new... leftovers...


Actual leftover ham, boiled sweet potatoes, mashed potatoes, stuffing and green beans.

All I had to do was layer them up.  I started with the turkey on the bottom, then a layer of stuffing.  I then drizzled those layers with gravy.


It's not thanksgiving without gravy.

Then the sweet potatoes and green beans, then the whole thing gets topped with the mashed potatoes.  Just look at all those layers!


The biggest problem with this was that it was super messy to serve.

And that it didn't have nearly enough gravy in it, as daddy and little miss were very quick to point out.


If I make this again next year (or, hey, any time I make turkey...), I will not only add more gravy, but I also want to try to incorporate the cranberry sauce, which I served on the side, in the dish somehow.

With how much I love shepherd's pie, I had really wanted to make several other versions as well, but the month totally got away from me.

Andy, thank you so much for this fun, delicious, inspired challenge.

To see the recipes that Andy provided to us for inspiration, you can check them out here.

And to see the other great versions cooked up in the Daring Kitchen this month, you can check them out here.


If you are looking for a recipe here, I actually don't have one, since I totally winged it, but I can tell you that I used one breast and one drumstick from an 18 pound turkey, about a cup and a half of stuffing, about one cup of gravy, one pound of green beans, two cut and boiled sweet potatoes and six russet potatoes, mashed with butter. Once everything was layered, I baked it in a 350 degree oven for about 45 minutes, covered for the first 30, uncovered for the final 15. If you try this, absolutely let me know! And I hope you enjoy it as much as we did!

Wednesday, December 12, 2012

Crock Pot Rotisserie-Style Chicken

I love my crock pot. It's hard to believe that I went so many years without it.  I love that I can prepare a meal in the morning (or even the night before), then just set the cooker and forget about it until it's time to eat.

Recently, daddy came across a recipe that promised rotisserie style chicken right in the crock pot.  In addition to the crock pot, we also love rotisserie chicken, so this looked absolutely perfect. So we gave it a try.

It was super easy to prepare - a few cloves of garlic and a bunch of spices into the mini-blender...


...then mixed with a bit of water until it forms a paste.


Not beautiful, I agree, but it smelled spicy and delicious.  This paste is then generously rubbed all over a chicken, both inside and out.

Again - not beautiful, bit it gets the job done.


Then the lid goes on the slow cooker and it does its thing all day long.

By the time dinner time comes around, the chicken is falling-off-the bone tender and ready to eat.


While the meat is tender and moist and full of flavor, I have to say, it doesn't really taste like rotisserie chicken.  The combination of spices is stronger, and the crock pot makes the crispy, delicious skin that you find on a rotisserie chicken impossible to accomplish. But, if you set aside those expectations, the results are delicious.


And when deliciousness is that easy and effortless, it's sure to be repeated.


Crock Pot Rotisserie-Style Chicken
(from busy mommy)


1 broiler/fryer chicken (3.5-4 lbs)
2 tablespoon paprika
1/2 teaspoon cayenne pepper (optional)
1 1/2 teaspoon onion powder
2 tablespoons garlic powder or 3 cloves garlic
1 teaspoon salt
1/2 teaspoon black pepper

Place all of your ingredients in a small bowl and stir in water by the teaspoon until a paste forms. Or, as I did, you can combine the garlic cloves and spices in a mini blender and blend everything together, adding water to achieve the right consistency.
Spray your slow cooker with cooking spray and place the chicken in, breast side up.
Coat the chicken inside and out with the paste. Cover and cook on low 6-7 hours or on high 3.5-4.5 hours. Make sure the thickest part of the thigh registers at 180 degrees.


Enjoy!

Monday, December 10, 2012

Sloppy Joes

Growing up, sloppy joes always meant browning some ground meat and opening up a can of sauce. Easy, fast meal.

And while I liked the meal just fine, I never quite saw what the big deal was.

And then I decided to try to make the same meal, minus the can.

Oh. My. Gosh. 

So worth the big deal. Same browned meat, same quick and easy, so much more flavor. So much more yum. 

I usually just wing it, as far as the "recipe" is concerned, but I (loosely) based the version I made today on this version from Ree over at The Pioneer Woman. Because that's always a good place to start!

The longest part of the process was chopping the veggies, but as it was just onion, pepper and garlic, that didn't even take that long.


Once the meat was browned and the chopped veggies added, it's time to create the sauce. Ketchup and spices. That's it.


Okay, add some water, too, to thin it out, and some Worcestershire sauce, too, to kick the flavor up a notch.

Then simmer until it's time to eat.

Serve on buns (baked fresh this afternoon!) and you are done!


The best part? Both kids ate it right up - score!


Sloppy Joes
(based on The Pioneer Woman)

1 tablespoon olive oil
1 pound ground meat
2 small onions, diced
1 bell pepper (I used yellow, you could use green or whatever you like), diced
2 cloves of garlic, minced
3/4 cup ketchup
1/2 cup water
1 tablespoon brown sugar
1 teaspoon dry mustard
1/2 teaspoon chili powder (more or less to taste)
Worcestershire sauce (to taste - I used a few shakes of the bottle...)

Add olive to a large skillet over medium high heat. Add ground beef and cook until brown. Drain as much of the fat as you can.
Add onions, pepper, and garlic. Cook for a few minutes, until vegetables begin to soften.
Add the ketchup, brown sugar, chili pepper, dry mustard, water and Worcestershire sauce. Stir to combine, bring to a boil, then reduce heat and simmer for at least 15 minutes. Taste and adjust seasonings as needed.
Serve on kaiser rolls.

Enjoy!

Saturday, December 8, 2012

Pan-Fried Pork Chops

As you might imagine, we enjoy cooking shows around here. Competitions, demonstrations, professionals, amateurs, cooking, baking - always fun to watch.

One of the shows that we enjoy is America's Test Kitchen.  They not only make delicious food, but the explain why their recipes work - they test all of the ingredients, equipment and processes until they come up with what they feel is the best recipe they can provide.

Recently we saw an episode where they made crispy pork chops. And if there's one thing that daddy likes, it's crispy pork chops.  So we had to try them.

I found the recipe online here. The only "issue" is that you have to register to see the recipe in print. And I've registered before, but I always have trouble signing in again... But the video was available without signing in, so I did what any crazy foodie would do - I watched the video half a dozen times, jotting down the measurements and processes as I did.

The main secret to the crispy breading on these pork chops is the breading. Which isn't bread at all - it's crushed corn flake cereal.


The other key step is that the pork chops are scored prior to being breaded, which helps ensure that the pork chops are flavorful throughout.


Then the chops are breaded with a bound breading. This process usually involves being dipped in flour, then in an egg wash, then in the bread crumb mixture being used. In this case, corn starch is used in place of the flour, buttermilk in place of the egg was, and the crushed corn flake cereal in place of bread crumbs.  But otherwise, it's your standard bound breading.

The result, though, is a even coating of crispy goodness.


The chops rest for a bit before being pan fried for about six minutes per side, enough to cook the meat throughout and create a beautiful, golden crust on each chop.


The result was a delicious, flavorful and perfectly crispy pork chop that made an absolutely delicious dinner.


I served these chops on a bed of arugula, with baked sweet potato and sauteed collard greens on the side - yum.  Definitely worth the re-watching and the effort!


Pan-Fried Pork Chops
(from America's Test Kitchen)

8 pork chops, 1/2" - 3/4" thick each
3-4 cups corn flake cereal, crushed to crumbs in food processor
1/3 cup + 1/3 cup corn starch (separated)
salt and pepper to taste
1 cup buttermilk
2 tablespoons dijon mustard
1 clove garlic, minced
canola oil for frying

Combine (in your food processor while crushing the cereal, if you want) the crushed cereal crumbs, 1/3 cup of corn starch and about a teaspoon each of salt and pepper (to taste). Set aside in a shallow dish or pie plate.
In another shallow bowl or pie plate, whisk together the buttermilk, dijon mustard and minced garlic.
In another shallow bowl, set the last 1/3 cup of corn starch.
Carefully score each pork chop, making shallow cuts across the surface of each side of each chop. Sprinkle salt and pepper over each chop.
Dip each pork chop first into the corn starch, making sure that the entire surface is lightly dusted - no clumps, but no bare spots.
Next, using tongs, dip the chop into the buttermilk mixture until it is coated all around.
Now transfer the chop to the crushed cereal mixture, coating well on all sides.
Set the coated pork chop on a rack.
Repeat with all chops and allow to rest for about 10 minutes.
Meanwhile, heat oil (about 1/3 cup - you want about 1/4" in the pan) in a large frying pan over medium-high heat until it is shimmering.
Fry the chops (in batches - don't crowd the pan) for about 5-6 minutes per side, until golden brown on each side.
Remove each chop from the oil (once done on both sides), resting on a paper towel for only 30 seconds, then to a clean rack. You can put the rack on a cookie sheet and keep the pan in a warm oven while you continue cooking the remaining chops.
Serve and enjoy!


Tuesday, December 4, 2012

Peanut-Free Puppy Chow

Would you believe I have never made puppy chow before? To be completely honest, before this year, I didn't even know what it was. And I only know this year because I finally googled it.  

Puppy chow, muddy buddies, monkey munch... whatever you call it, it looked delicious. But seeing as one of the primary ingredients in it is peanut butter, I filed it in the no-go category for our house.

But I couldn't forget about it.  And I wondered... I can't be the only person with a peanut allergy kid who wants to try this deliciousness... I bet...

Yup! Another quick google search later, and this beautiful recipe told me that you can easily substitute sunbutter for the peanut butter!  So today I went for it.

Chex cereal is what is usually used, but I used Life, since I have a huge, gigantic double-bag box of it.  The recipe called for four cups, but when I scooped out the four cups into my big bowl, I didn't think it looked like enough... so I increased everything in the recipe by 50% and used six cups. 


Cereal measured, it was time to make the coating - chocolate chips, butter and sunbutter. The recipe said to microwave the ingredients until they are all melty, but I chose to just melt everything in a medium saucepan over medium heat. It was just easier for me.


Once everything was all melted and all incorporated, just pour and mix!


And then make it snow. I mean, sprinkle liberally with powdered sugar.


Another round of mixing, and it's done!

All that's left to do is try to keep everyone's hands out of it.


Little man loved it. So did little miss when she came home from school. So did little miss's friend when she stopped over to play. This stuff is super addictive. I am glad I made the extra large batch... I can tell I'll be making this again!


Peanut-Free Puppy Chow
(from jellytoast, proportions increased from original)

6 cups of crunchy cereal (such as Life, Chex or Crispix)
3/4 cup of chocolate chips (whichever kind you like)
6 tablespoons of butter or margarine
6 tablespoons Sun Butter or other sunflower seed butter (or peanut butter if you don't have an allergy)
1 cup of powdered sugar

Place chocolate chips, butter and sunflower butter in a medium saucepan. Heat over medium heat, stirring regularly, until everything melts. Mixture should be nice and melty and well incorporated.

Pour cereal into a large bowl. Spoon melted chocolate mixture over cereal and toss to coat. This will take a few minutes to cover thoroughly. It works well to spoon the chocolate mixture on in batches and stir as you go. Once the cereal is well coated in the chocolate, sprinkle half of the powdered sugar over cereal mixture and toss gently. Sprinkle remaining sugar over mixture and toss to coat. Allow to cool. Store in an air tight container.

Enjoy!

Friday, November 30, 2012

Apple and Honey Sourdough Bread for BBD #54

I was in the mood to try a new sourdough bread this week.  Something fun, something fresh, something delicious.

After considering all of my options (including, but not limited to, all fruits and vegetables currently in the house, not to mention the idea for a chocolate sourdough bread that just won't leave my mind...), I decided to go with a classic Fall flavor - apples and honey.  And to liven it up a bit, I decided to infuse the bread with one extra flavor:

DSC04253

Green tea. Just to see what would happen.

I have made a couple of different sourdough loaves, using a couple different formulas/recipes. I referred back to my previous attempts and adapted them for this loaf.

I started by making the levain - using my 100% hydration liquid starter to create a firm starter, just by changing the usual ratio of flour and water used to feed the sourdough.  And after an overnight rest, it was time to make the bread.

The next morning, I combined the stiff starter with additional flour, applesauce and green tea, to infuse a bit of extra freshness to the flavor of the loaf.  Once the dough was all incorporated, it was time to add the flavor - a diced apple and a generous swirl of honey.

DSC04257

But after the first hour's rest, I saw that something wasn't quite right...

DSC04273

Umm.... it seemed to be leaking. Weird.

And that's when I realized what I'd done. I'd confused the two recipes that I'd been referring to. I used the firm starter measurements from one recipe and the loaf measurements from another, which may have something to do with the extra moisture that resulted here. Or it might have had something to do with the apples... I'm not sure.

Either way, when it came time for the next set of stretching and folding, I had to use some extra flour and a clean bowl, but it still came together pretty well.

DSC04279

And after its final, longest rest, it was ready for the oven.

Now, I know I always talk about how good things smell as they bake, but it really is true. Aside from the delicious bread scent, the apples added another delicious layer to the aroma. Seriously good.

And then came the hardest part of the process. The waiting.

But the reward of cutting into this bread is definitely worth the patience.

DSC04285

A nice, thick crumb, but a pretty open yet moist crumb - this bread is delicious, with the heartiness of the apple chunks, and the interplay of the tanginess of the sourdough with the subtle sweetness of the honey - a truly delicious combination.

So good that someone couldn't wait to get his piece...

DSC04290

Before I had the chance to write this up, I happened upon the announcement for this month's Bread Baking Day theme - overnight breads!  While the announcement indicates that most overnight breads are rested overnight at the end, at the proofing stage, I thought that this one, with its overnight fermentation of the firm starter, fit the bill, so I am sharing this bread with this month's host over at Hefe und mehr.


Apple and Honey Sourdough Bread
(my own creation, based on previous attempts)

For the firm starter:
2/3 cup sourdough starter (100% hydration)
4.5 oz. bread flour
1/4 cup water

Mix these together and let ferment at room temperature for 4 hrs. Refrigerate overnight (or even up to a few days).

For the bread:
all of the levain
9.25 ounces flour
0.125 ounces salt
3.25 ounces brewed green tea (brewed strong)
4.75 ounces apple sauce
1/4 cup honey
1 apple, diced

Combine the levain, flour, tea, salt and applesauce, and allow to rest for 20 minutes.
On a lightly floured counter, stretch out the dough into a long rectangular shape.
Drizzle the honey and sprinkle the diced apple pieces as evenly as possible across the dough, theb fold/roll the dough over top (which ever method you want to do this is fine, you just need to get it in there).
Place the dough in a large oiled bowl, cover, and allow to rest for 1 hour.
Stretch and fold the dough, place back in the bowl and allow to rest for 1 hour.
Make another stretch and fold, place back in the bowl, cover, and let sit for at least four hours.
(If you would like, you can place the dough in the refrigerator at this point to rest overnight)
When you are ready to bake, preheat the oven to 500 degrees and cover a baking sheet with parchment. Flour the parchment and turn the dough out onto it. Score the top of the loaf.
Place the bread in the oven and turn the oven down to 450.
Bake the loaf for 25-35 minutes, until nicely golden brown.
Cool for at least 1-2 hour before slicing.

Enjoy!
Related Posts with Thumbnails