Tuesday, September 27, 2011

September Daring Bakers' Challenge - Croissants

I just love it when a Daring Kitchen challenge is announced and it is something I have been hoping to make. And that is exactly what happened this month!

The Daring Bakers go retro this month! Thanks to one of our very talented non-blogging members, Sarah, the Daring Bakers were challenged to make Croissants using a recipe from the Queen of French Cooking, none other than Julia Child!

I was so excited when I saw this month's challenge. I have made croissants before, and have been hoping for an excuse to make them again. Between the time and the butter, it always seemed like I needed an excuse. Well, this month I had my excuse!

The recipe that Sarah provided us was long and detailed - many, many steps, detailed pictures, and about twelve hours start to finish. Well, once I had my excuse, I wasn't going to put it off any longer, so I just jumped right in.

The recipe starts like most normal bread doughs - blooming some yeast.


Mixing in some flour.


Then setting the dough to rise. So what starts as a little ball of sticky dough like this:


In three short hours, turns into a lovely soft, beautifully risen ball of dough like this:


The dough is then pressed out by hand into a rectangle:


Then folded like a letter.


At this point, the dough is set to rise for a second time. While the recipe calls for it to rise for an hour and a half, I actually put the dough into the fridge overnight. Then in the morning, I just set the bowl on the counter to come back up to room temperature and it worked like a charm! So my second rise looked a little like this:


While the dough was coming back up to temperature, I worked on making my butter block. While this recipe actually called for spreading the butter onto the rolled out dough, I decided to go the more traditional croissant-making route of enclosing a rolled out block of butter into the dough.


One little stick of butter (much less than in most recipes!) all rolled into a flat little square, all ready to be enclosed in the rolled out dough.


The next steps are what turn a block of dough and butter into, well, it's still dough and butter, but what it turns into is called laminated dough.

The process involves a series of rolling and folding. The dough is rolled into a rectangle, then folded in three like a letter. Each iteration of this is called a turn. It has to be done gently, so that the layers stay distinct, the dough doesn't rip, and the butter is fully incorporated throughout the dough. It also has to be done slowly, with the dough resting in the refrigerator in between sets of turns so that the butter doesn't get to warm or melt into the dough.

Once the butter block was folded into the dough, I completed the first two turns, then set the dough into the refrigerator for a couple of hours.


I then took out the dough, let it rest for a bit, and completed two more sets of turns.

I then covered the dough and set it in the fridge overnight again.


The next morning was Saturday, and I was excited to make fresh croissants for brunch. The recipe says to cut the dough into sections and work section by section, to make sure that the butter doesn't get too warm during the rolling process, but, seeing as I had little miss and little man with me, I figured I could probably move fast enough to shape the croissants all at once.

I rolled the dough into a long rectangle and cut it into eight triangles.


Each triangle was then stretched a bit and rolled up, wide end to tip, to create the croissant shapes.


After proofing, I coated the croissants with egg wash, preheated the oven, and re-egg washed them.


Fifteen minutes later, brunch (or, well, the bread portion of brunch...) was ready.


These were delicious. Light, surprisingly buttery, considering that there was only stick of butter in there, and deliciously flaky.


After the success of my first batch, I had two more versions that I wanted to make. The first was based on croissants that we sometimes treat ourselves with when we go out - whole grain croissants. To do this, I swapped out the all-purpose flour called for in the recipe with whole wheat flour. I was concerned, though, that the whole wheat flour wouldn't stretch well. So I used part whole wheat flour and part high gluten flour, and hoped for the best.


As I went through the same steps as with the first batch, I was increasingly encouraged by how beautifully the dough rose throughout the process.


And once the croissants were rolled out, I was very excited.


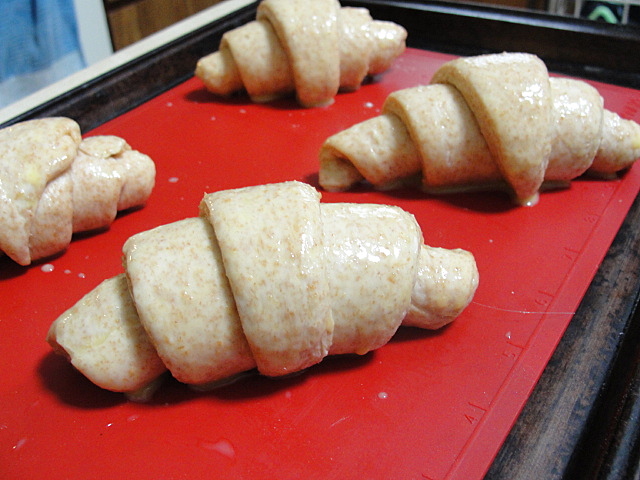
The whole grain croissants that we have bought are topped with a delicious seed mix, kind of like an everything bagel. To duplicate this, I sprinkled a seed and spice mix onto half of the croissants after the first egg wash (little miss doesn't like the seed mix, which is why we only did half).


And once these came out of the oven, we were just as excited. Little miss had her croissants:


And daddy and I had ours:


And in case you are curious as to how the whole wheat/high gluten flour combination worked out, as far as the lamination of the dough, it worked out beautifully!


I had every intention of making a third batch of these, and turning them into filled croissants (think chocolate!), but the month proceeded to get away from me. But now that I have played with this dough a couple of times, I am feeling much more confident in my ability to make laminated dough, and can guarantee that I will give these another go in the not too distant future.

Sarah, thank you so much for this challenge. It was just the push I needed to make croissants again, and I am so excited that I now have the confidence to keep going with it. I can promise that I will be making these again!

To see the beautiful croissants baked in the Daring Kitchen this month, check them out here.

Friday, September 23, 2011

Plum Cobbler

I have mentioned it before, but I kind of have a standard, go-to cobbler recipe. It's not a traditional cobbler, more like a fruit-and-cake-y kind of thing, but it is delicious, goes well with most fruits, and is super easy to make.

So today I found myself thinking about plums.


Mostly because I happened to have several of them in the house just begging to be turned into... something. There weren't enough for an actual pie, so I automatically thought of the cobbler. Plum cobbler? Never heard of it. So of course I had to try it!

Once the plums were sliced, the batter came together very easily.


The mixed batter is poured into the pan... which has been sitting in the preheating oven, allowing half a stick of butter to melt. Then the plums were set on top of the batter. But don't mix anything. You'll see the three different layers.


Plums over batter floating in melted buttery goodness. I promise this works.


See? Can't even see the plums! Actually, I am thinking it probably could have used a couple more plums... but I used all I had.

I made this while little miss was at school, and by the time I picked her up, it was all ready for our afternoon snack.


This was absolutely delicious. Little miss and I really enjoyed our snack, and when Daddy came home, he did his best to spoil his dinner with nibble after nibble...


As a side note, I just love the color of the cooked plums.


Plum Cobbler

1/4 cup butter
1 cup flour
2 teaspoons baking powder
3/4 cup white sugar
3/4 cup milk
1 teaspoon vanilla extract
6 plums, pitted and sliced (you could use more - totally up to you!)

Preheat oven to 325 degrees. Set the butter in a 9" x 9" pan and set the pan in the oven while it preheats. This will melt the butter. Just be careful not to let the butter burn.

Combine the flour, baking powder, sugar, milk and vanilla until well mixed and pour into the pan. Resist the urge to mix it together with the melted butter. Spread the plum slices over the batter. Again - don't mix anything.

Bake for 55-60 minutes.

Wednesday, September 21, 2011

Breakfast Pizza

Ah, pizza. So good, you can eat it any time of day!

We have made pizza several times, and last weekend, we decided to make one of the breakfast variety.

We looked around online at many pictures and recipes, then decided that we didn't really need a recipe - it's breakfast on a pizza. We could figure that out.

We started out on Saturday night by making the pizza dough. In an effort to keep our breakfast "healthy," I used half whole wheat flour. Once the dough was made, I wrapped it in plastic wrap, set it in the fridge and, well, went to bed.

Come Sunday morning, we were ready to get started.

We scrambled some eggs. We cooked some bacon. We diced some onions. Then put it all on the crust.


Then we grated up a whole lot of cheddar cheese and sprinkled it over the whole thing.


Twenty minutes later, breakfast was ready.


An omelet on a pizza crust. What could be better?


A cup of coffee, some cut up peaches on the side, this was a delicious breakfast.


So what kid of pizza will we have next??


Whole Wheat Pizza Crust
1 tablespoon yeast
1 cup whole wheat flour
1 teaspoon salt
1 cup warm (around 100 degrees) water
a splash of olive oil
1 cup (approximately - maybe more, maybe less) all purpose flour

In bowl of stand mixer, whisk together whole wheat flour, yeast and salt. Turn on mixer, fitted with dough hook, to low speed, and slowly pour in water, then oil. Add all purpose flour slowly until dough comes together in a ball. Allow dough to rest, covered, for half an hour. This is the point where I put the dough into the fridge, wrapped tightly in plastic wrap. When ready to use, take the dough out of the fridge and let it rest at room temperature for at least half an hour. Roll out the dough, cover with your favorite toppings (make sure that the toppings aren't hot when you put them on the dough!), then bake for 20 minutes at 400 degrees.

Wednesday, September 14, 2011

September Daring Cooks' Challenge - Stock and Soup

First off, let me start by apologizing for not posting as much recently. I promise - I spend a ton of time in the kitchen, and not only for the Daring Kitchen challenges. I even take lots of pictures, too! I have just been bad about sharing what we've been doing. But I promise I'll do better.

That being said, it is time for another Daring Cooks' Challenge!

Peta, of the blog Peta Eats, was our lovely hostess for the Daring Cook’s September 2011 challenge, “Stock to Soup to Consommé”. We were taught the meaning between the three dishes, how to make a crystal clear Consommé if we so chose to do so, and encouraged to share our own delicious soup recipes!

I love soup. Especially a good, hearty, wholesome soup chock-full of yumminess. I've actually shared several different soups right on this very blog (here, here and here). And nothing makes soup taste better than homemade stock.

In preparation for my stock, I saved all of the chicken bones from our roasted chicken dinners. Two roasted chicken dinners, to be precise - I wanted lots of good flavor in there, and I wanted all that natural goodness that comes to stock from having all those bones in there.


I covered all that chicken (well, okay, two carcasses, one with half the meat still on it) with water and brought the heat up.

Then I set to chopping. Onions, carrots, leeks, celery - all right into the pot.


Then I let the pot do its thing. As soon as it came to a boil, I lowered the heat to a simmer, and just let all of those delicious flavors do their thing.

After a couple of hours, it was time to see what we had. I fished out all of the bones, then ran everything else through a strainer into containers.


Now, I wasn't sure, going into this, what kind of soup I wanted to make. But after smelling the amazing aroma of chicken stock all day, my creativity was strongly overwhelmed by my desire for some comfort food. So I made chicken soup.

Now, Peta did challenge us all to make something to serve with our soups. And what goes better with chicken soup than, well, bread? There is nothing like a yummy piece of toasty bread, all covered in butter, to dip into soup and to clean the bowl, mopping up every drop of goodness.

So I made some yummy long rolls. When the cooled, I sliced them most of the way through, then popped them back into the oven for a few minutes to toast up.


Then we each got a few rounds, nicely buttered, next to our soup.


YUM.

Now, In addition to making soup, Peta challenged us to try our hands at the very difficult process of turning our stock into consomme. Consomme is basically a clarified stock, in which the flavors are concentrated but the clarity is, well, pretty stunning. I saved a quart of my stock in order to try this process.

Then I forgot what it was saved for and used it to make quinoa pilaf.


Nope, that's not a pot of soup, that's my delicious, flavorful stock ready to be absorbed by a pot full of quinoa.

The good news is that the delicious, full bodied stock added an amazing richness to the quinoa.

Again - YUM.

The bad news is that this past month has been the hottest in this region in decades, and by this point, my family did not want more soup. So I didn't go for a second pass at this challenge.

The upside of this, though, is that it has given me a personal goal of attempting to clarify stock into consomme. And it gives me a reason to look forward to the cooler weather in the months ahead - lots more stock, lots more soup, and the continuation of this challenge.

Peta, you are a lovely, gracious and super sweet hostess, and I thank you for this delicious challenge. I hope to try all of the recipes that you provided us for inspiration this month!!

To see the yummy goodness simmered up in the Daring Kitchens this month, check it out here.
Related Posts with Thumbnails