Wednesday, September 29, 2010

Pumpkin Season Begins

Fall is finally in the air. Yes, I know that the first day of Autumn was technically last week, but that is not what has us feeling the season in this house. What has us in the Fall spirit is the sudden appearance of pumpkins everywhere we go, from the food stores to roadside stands to every produce stand we see.

Little miss loves pumpkins, so we couldn't resist picking up a few this past weekend. We grabbed three - two big and one smaller one. Originally, little miss told us that she wanted these pumpkins to be for decoration purposes, to place on our front steps and make the house look ready for the season. But then she changed her mind. And wanted to eat one.

After cutting the pumpkin in half, it was little miss's job to scoop out the seeds. The seeds were set aside in their own bowl, then I helped her scoop out the rest of the stringy pulp. Once the pumpkin halves were ready, they were placed cut-side down on a cookie sheet and baked in a 350 degree oven for, well, I didn't really time it, but it was probably about half an hour our so, until I could easily pierce the skin with a fork and the flesh was nice and soft.

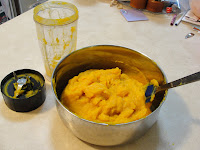
Once the pumpkin cooled enough to handle, it was time to turn the fruit into a nice smooth puree. This is most easily accomplished with a food processor. In the absence of said appliance, I put my mini-blender to work. And it earned its stripes that day, with how many batches I had to do to successfully puree all of the fruit, but after much scooping and blending, we soon had a nice bowl full of fresh, smooth pumpkin puree, ready to be used in all sorts of recipes.

And little miss knew exactly what she wanted: cupcakes. I hopped online to look for a recipe, and soon found one that looked delicious. And familiar. I couldn't figure out why it looked familiar to me, as I know I have never made pumpkin cupcakes before... until I looked at my listing of bookmarked sites, and realized that I had seen this recipe before, and had bookmarked it for future trial. Well, hey - I knew I had the recipe that I wanted to try!

This was a really interesting recipe, in that it is not put together the way most cake/cupcake recipes that I am used to do. Usually, the ingredients are added in a specific order, mixed for specific, and relatively short, periods of time. Nope - not with this one. In this recipe, all of the ingredients are added to the bowl at the same time, and then the mixer is put to work. For 25 minutes. I was super glad to have the KitchenAid for this one - I can't imagine either mixing this by hand or even holding a hand-mixer to this for that long. And with the consistent, strong mixing of the stand mixer, the result was a very smooth batter that looked and smelled fantastic.

One of the first things that we noticed upon taking the cupcakes out of the oven was the interesting way in which they had risen. Most of the cupcakes not only rose in the middle, but also rose up around the edges, creating something of a crown around the cupcake top. Very interesting. But I knew it wouldn't make too much of a difference what the tops looked like, as we were not done - we really wanted to try the cinnamon brown sugar buttercream frosting recipe that was posted with the cupcake recipe.

The frosting recipe, as written, calls for a combination of butter and shortening. Unfortunately, I do not currently have shortening in my pantry, so I made my frosting using all butter, rather than a combination. The end result, though, was absolutely delicious, and was the perfect match for the cupcakes. I think the frosting would also work really well for, say, a banana cake, so I definitely plan on making it again.

But wait - there's more!

We had plenty of pumpkin puree leftover, so I decided to try something special for breakfast the next morning. Little miss and I added some of our pumpkin puree, along with some cinnamon and nutmeg, to our regular pancake recipe. Oh my, what a fantastic breakfast treat. I can't think of a better breakfast for a cool, fall morning than pumpkin spice pancakes with pure maple syrup. We will definitely make these again.

And in case you are curious, we also roasted up the seeds from the pumpkin, so as to enjoy as much of our first pumpkin as possible. I am really looking forward to the rest of pumpkin season!


Pumpkin Pound Cake Cupcakes

1 cup sugar
1/2 cup packed brown sugar
2 cups all purpose flour
2 teaspoons baking powder
1/2 teaspoon salt
1/2 teaspoon cinnamon
1/4 teaspoon nutmeg
4 eggs
1/2 cup milk
3/4 cup pumpkin puree
1 stick unsalted butter, softened

Preheat oven to 350 degrees and line two standard muffin pans with cupcake liners (or spray well with non-stick cooking spray)
Combine all ingredients (yup, all of 'em!) in the bowl of your stand mixer. Beat on medium for 20 minutes.
Once the batter is smooth, fill each cupcake well (lined or sprayed) about 2/3 full with batter.
Bake for 20 minutes, until a toothpick inserted into the center comes out clean.
Cool the cupcakes in the pan for a few minutes, then transfer them to wire racks to cool completely.


Cinnamon Brown Sugar Buttercream Frosting
(only slightly adapted from My Kitchen Addiction)

3/4 cup (1 1/2 sticks) unsalted butter, softened
1/3 cup brown sugar, packed
1/2 teaspoon cinnamon
3 cups powdered sugar (may need more)
3 tablespoons half and half (more or less)

In the bowl of your stand mixer with the whisk attachment, beat the butter until light and fluffy. Add the brown sugar and cinnamon and whisk until well combined.
Gradually add the powdered sugar, 1/2 cup at a time. Alternately add a little bit of the half and half, whipping the icing on medium-high speed after each addition, until the desired consistency is reached.

Frost cupcakes once they are completely cooled.

Enjoy!


Monday, September 27, 2010

September Daring Bakers Challenge - Decorated Sugar Cookies

Man, time is flying! Time for this month's Daring Bakers Challenge, so sit back and enjoy!

The September 2010 Daring Bakers’ challenge was hosted by Mandy of “What the Fruitcake?!” Mandy challenged everyone to make Decorated Sugar Cookies based on recipes from Peggy Porschen and The Joy of Baking.

I have to tell you - reading this challenge, I had mixed emotions. This challenge, for me, was half and half - half no problem, half super tough, and I kinda knew that just from reading it.

Making sugar cookies, for me, is no problem. Little miss and I love making cookies, and love any opportunity to pull out the cookie cutters. This was the part of the challenge that had me pumped.

But the challenge wasn't just to make cookies, we also had to decorate them. With royal icing. The only cookie decorating I have ever done is with sprinkles. And is not the kind that requires any skill, artistic abilities or patience. This was the part of the challenge that had me a little scared.

Our host, Mandy, gave us only two "restrictions" for this challenge - that we make our cookies from scratch, using a specific recipe, and that we use the theme of "September" to guide our creativity.

The first thing that little miss and I did was to go to our big bucket 'o cookie cutters to see what we had, and to think about what September means to us. There were so many possibilities - mine and my husband's wedding anniversary was this month, so I considered doing hearts. Little miss started Pre-K this month, so i was thinking about ABC's and 123's. September marks the start of Autumn, so I considered apples, pumpkins, leaves... There were so many possibilities, and we had cookie cutters to match whichever whim we followed.

Our decision, however, was made a week later, on the NFL's opening day. What could be more fun than celebrating the beginning of football season with some fun cookies??

The first step was to bake the cookies. The recipe was very straightforward. The first thing we had to do was bring a whole lot of butter up to room temperature, which is most easily accomplished by cutting it up, rather than trying to bring it up to temperature in stick form.

The second ingredient was the sugar, though this recipe called for caster sugar, which is slightly finer than the "regular" granulated white sugar that I have in my pantry. The solution was found in my trusty mini-blender. A quick spin in there and we were ready with some pseudo-caster sugar.

Once our ingredients were ready, little miss manned the mixer, and we put together the batter. The recipe was easy to follow and made a batter that was very easy to work with.

Like most rolled-cookie recipes, this one called for the batter to be refrigerated once it is prepared. One hint that Mandy gave was to roll the dough prior to refrigerating it, rather than refrigerating it all in a big ball. This worked out really well. The dough was much easier to roll prior to being chilled, and then it chilled much more quickly once it was rolled into flat sheets. I will definitely be using this tip in the future for other rolled cookie endeavors.

The next step was to cut out our shapes. One of the fun things about working on these challenges over the weekend is that daddy is able to help photograph our efforts. Little miss and I each grabbed a cookie cutter and got down to the business of turning our sheets of dough into footballs and helmets. Our shaped cookies were once again placed into the fridge, as cooled dough will spread less when cooked, then were baked and set out to cool completely before being decorated.

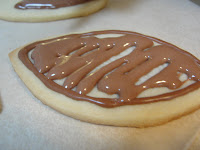
Now came the tricky part. Decorating. Royal icing, in and of itself, is very easy to prepare - egg whites, confectioners sugar, a little bit of water and there you have it. We had only one issue with the preparation of the icing, and it was one that was probably unnecessary. We have been cutting out a variety of chemicals and preservatives from our diets, and have been unable to find any food colorings that aren't made predominantly of artificial chemicals with preservatives. Hmm... how was I going to decorate my cookies? Well, one advantage of our choice of cookie shapes is that footballs are brown. A color that can be accomplished by substituting some cocoa powder for some of the confectioners sugar in the royal icing. No food coloring required!

In lieu of a pastry bag (which I don't have), we filled little plastic squeeze bottles, usually intended for candy making, with our icing and prepared to decorate our cookies.

The basic method for decorating cookies with this kind of icing is a two step process of outlining and flooding, which actually works exactly like it sounds.

Outlining:


And flooding:


I then used the tip of the bottle to carefully spread the icing to evenly fill my outline, and then set the cookies aside to dry. Once the footballs were outlined and flooded, I moved on to the helmets. Just for the sake of making them different, we made a second batch of white royal icing for the helmets.

I reserved some of the white icing to add some stitching detail to my footballs. Unfortunately, I didn't wait quite long enough for the chocolate icing to dry before adding the detail lines, and my white icing was probably a little thinner than it should have been, so my lines spread a bit more than I would have liked, but in the end, it was clear that what we had created were footballs and helmets, so I was pretty proud of our efforts.

Mandy, thank you so much for such a fun and creative challenge. I know that this is something that I would not have tried without this push, and I now look forward to trying this again (if I can manage to find some natural food coloring alternatives...). I am so glad that this challenge gave me the opportunity to learn and try something new.


I highly recommend checking out the works of my fellow daring bakers. I am awed and amazed by the talent and creativity that was displayed as a result of this challenge, and I know you will be too.

Thursday, September 23, 2010

Streussel Cake

The other day, I suddenly had the urge to bake a cake. Usually, when the urge to bake strikes, it is pretty vague - I just feel like baking, and then have to figure out what sounds good. This time, the urge was specific. I felt like making a cake. A streussel cake. Not sure where that came from, but there it was.

As luck would have it, we had just recently stumbled across a recipe for a yellow cake that was claimed to be the best. And since the recipe has survived for 100 years and is still said to be the best, well, I was inclined to believe it.

As additional luck would have it, my mother in law was happy to loan me her bundt pan, which made the prospect of baking a streussel cake even more enticing.

The first step was to prepare the streussel topping. I don't have a standard streussel topping recipe, so I kinda winged it. We started by crushing some pecans, a job little miss was more than happy to help with. The nuts were mixed with some brown sugar, cinnamon and flour, to which we then cut in some butter. We sprinkled a little bit of the topping into the bottom of the greased bundt pan, then set the rest aside to be used later.

My budding baker helped me measure, pour and work the mixer. The batter actually came together beautifully, and I was extremely pleased with the recipe selection.

Once the batter was prepared, we poured half into the bundt pan, over the light layer of streussel topping, and then proceeded to sprinkle on the remaining topping. Little miss loves any opportunity to dive into a recipe with her hands, and this was no exception. Once we had a good layer of the nutty topping on there, we covered it up with the second half of the cake batter.

Then came the tricky part - the yellow cake recipe is written with a baking time assuming that you are baking it in two eight-inch round cake pans. A bundt pan makes a much thicker cake, and I wasn't exactly sure how to adjust that baking time. Obviously it would need more time, but I wasn't sure how much. I started with adding ten minutes to the recommened 30 minutes. When the timer beeped, I checked the cake, and it was definitely not ready, so I set the timer for ten more minutes. Still not done, but much closer. After five more minutes, I knew we were close. Two more minutes did the trick.

Once the cake cooled for a couple of minutes, I turned it out onto a plate to finish cooling. But we weren't ready to serve it yet - it still needed one finishing touch. Little miss and I have become pretty big fans of glaze toppings on our cakes, so of course we felt that this cake was incomplete without one. Our usual concoction of confectioners sugar, milk and a touch of vanilla extract came together beautifully, and made the perfect decorative (not to mention, tasty) drizzle.

All that was left to do was to wait for dinner to be done to cut into this! When we did, I was interested to see that the "middle" layer of streussel topping had migrated almost all the way to the top of the cake, rather than remaining in the middle. I am not sure if was because the topping was too heavy or because the cake batter was a little too delicate to hold it up. Regardless, the cake was delicious. It made a great dessert that night, and an even better breakfast the next morning.

I can guarantee that I will be making the yellow cake recipe again, for different uses, and in different incarnations. I will also use the bundt pan again before returning it to my mother in law - it definitely adds a new layer of fun to cake baking. All in all, not too shabby for a sudden baking urge.

Monday, September 20, 2010

Chocolate Chip Cookies, Little Miss Style

So you all see how involved little miss is in the kitchen. It amazes me every time we step in the kitchen how much more she can do.

So I decided to give her the opportunity to go it (mostly) alone, just to see what would happen.

I found a book at the library in the children's section, geared towards young bakers. The book includes a lot of photographs of the ingredients and the process, and is laid out in a very kid friendly way. That being said, I think it was intended at kids a little older than four, but I thought she was up for the challenge. I let her go through the book and choose any recipe she wanted, and she chose chocolate chip cookies. Love that girl. :)

I pulled out all of the ingredients, bowls, spoons and measuring cups, and then I just stood back, read off a couple of directions, and let her have at it.

She measured out all of the ingredients:


She cracked the eggs:


She beat in the flour. By hand. Even mastering the use of the spatula to help loosen the dough that got stuck on the spoon:


She added in the chips:


And she shaped the cookies:


(yes, her hands were washed many times throughout this process...)

Then came the one part that I wouldn't let her do - the oven part. I put the pan into the oven, set the timer, then took the pan out when the timer went off. As for the results?


Delicious.

I think I will let her do this more often!

Tuesday, September 14, 2010

September Daring Cooks' Challenge - Food Preservation

The September 2010 Daring Cooks’ challenge was hosted by John of Eat4Fun. John chose to challenge The Daring Cooks to learn about food preservation, mainly in the form of canning and freezing. He challenged everyone to make a recipe and preserve it. John’s source for food preservation information was from The National Center for Home Food Preservation.

When I first read this challenge, I had very mixed feelings. I have never tried my hand at canning before, and, quite frankly, I have been scared to do so. I have heard scary stories about bacteria and botulism and all kinds of things that could go wrong if the canning process didn't work. On the other hand, it lets you take advantage of seasonal fruits and veggies year round, and have greater control over the foods you eat.

With the detailed instructions from John, as well as great hints and tips from other veteran canners on the Daring Cooks' forum, I decided to push my fears aside and give the challenge a go.

John provided a couple of recipes to get the group started, but did not limit us to those recipes. The primary recipe that he gave was for apple butter, as apples are now coming into season (at least in the U.S.), but he also gave a couple of tomato recipes, as well.

Since I had never done any canning before, I wanted to do a trial run before "committing" to an actual recipe. Not willing to step too far off the path for my trial, I chose John's "Bruschetta in a Jar" recipe, using tomatoes, vinegar and garlic (primarily), as I had all of the ingredients readily available. The preparation process itself was very simple - a sterilized canning jar is filled with diced tomatoes, then topped with a cooked mixture of vinegar, garlic and spices. The lids, which were kept warm in a pot of water, were then carefully centered on the jars, then secured with the jars' sealing rings. So far so good.

Then came the part that made me nervous - boiling the jars to secure the seals. I do not have a formal canning set, with a rack and a jar lifter and all of the other tools that make the canning process easier. Instead, I jerry-rigged a setup using my biggest pot (8 quarts) and crumpled foil under each jar in place of a rack. After boiling the jars for the 20 minutes indicated by the recipe, I carefully lifted them from the boiling water bath using regular kitchen tongs and set them aside to sit for 24 hours to then test the seals.

There are several ways of checking that the jars have fully sealed, from a visual check of the lid, to pressing the lid to make sure that it does not move or pop up at all. The biggest test, though, is the "lift" test. If the jar is sealed properly, you should be able to lift it by the lid, without the sealing ring. As you might imagine, I was very nervous about attempting the lift test, visualizing the mess that would ensue should the jar not actually be sealed. But after looking at and touching the lids, making sure in every other way that the boiling process had worked, I tried it. And guess what? It worked! Both jars lifted beautifully, proving that I had correctly canned my tomatoes! Woo hoo!

With my trial run completed so successfully, I was much more confident about trying my hand at canning something else. Luckily for little miss's adventurous side, our local orchard had several crops in season, just waiting to be picked, so we selected two additional recipes to make and can.

We started with end of season raspberries, with plans of making jam. Of course, in order to make enough jam to justify canning, it takes many, many, many raspberries. It took us quite a while, but we were finally able to pick about three pounds of these beautiful, bright red berries.

Also, in the spirit of the challenge that John originally put forth, we decided to pick apples, too, to make apple butter. We chose to pick Ginger Golds, as the orchard's picking guide indicated that they were good for sauces and for cooking. They were actually very fun to pick, since the trees were very little, meaning that little miss could easily reach the apples herself. We managed to pick eleven pounds of these beautiful apples before deciding that fourteen pounds of fruit in one day was probably good for the "small batches" we'd intended to make.

I chose a very simple jam recipe for the raspberries, using two ingredients - equal parts berries and sugar. Apparently raspberries are high enough in pectin that, given a bit of cooking (with the sugar, of course), no additional pectin is needed for the jam to jell up appropriately. A bit of mashing and a whole bunch of stirring, and I was ready to give the canning a second go. After a brief stint in the boiling water bath, I soon had two beautiful jars of really delicious raspberry jam. At this point, we have actually eaten most of one jar (and these were the big jars!) already, but I have the other jar in the pantry and am look forward to enjoying it in a couple of months, as a reminder of the wonderful summer fruit we were able to pick.

As for the apples? We love our crock pot for making apple sauce and apple butter. Little miss loves to watch me use the apple corer, and had the fun job (I swear, she enjoyed it!) or scooping the chopped apples into the crock pot. A little bit of brown sugar and cinnamon and many hours later, we soon had some super delicious apple sauce (little miss decided she would rather apple sauce to apple butter), of which we actually only made one actual jar. The rest was stored in the refrigerator in regular plastic containers, and was eaten very, very quickly. I don't expect our lone jar to last much longer, either... Lucky for us it is only the beginning of apple season - I plan on enjoying homemade applesauce for as long as possible after this season, now that I am comfortable canning it.

Thank you, John, for this challenge, without which I would never have tried my hand at food preserving. I am excited to be able to make and preserve my own jams and other fruit and veggie products, and to have yet another kitchen skill to add to my arsenal!

To see some of the fun canning projects undertaken by the other Daring Cooks, check them out here.

Saturday, September 11, 2010

Bagels

We love bagels around here. Particularly for weekend brunches, but they are delicious every day, for just about any meal. I actually craved bagels for most of the first half of this pregnancy. But I had never made bagels. It just seemed... complicated.

Until I started reading The Bread Baker's Apprentice. After my success with the cinnamon buns, and reading his bagel recipe, I knew that this would be my second experiment from this book.

The recipe called for two specific ingredients that I did not have on hand, and that are actually somewhat tricky to find. The first is high gluten flour. While many supermarkets have a variety of flours available, high gluten flour is not usually among those options. Luckily for our endeavor, we have a local store with a bulk-goods section, where I can generally find some of my more obscure baking needs. Including high gluten flour.

Unfortunately, we did not have the same luck in the bulk section with the second hard-to-find ingredient - malt syrup or malt powder. This is a barley product, and, according to Peter Reinhart, gives the bagels a more authentic taste. He did offer substitutions, if malt syrup or powder could not be found, but also recommended looking in natural food stores. I called our local natural pharmacy/food market and was pleased to hear that they did, in fact, carry both the syrup and the powder. I chose the powder, as the syrup was sold in larger quantities, and, as of right now, I do not have any other uses for it.

All ingredients in hand, I was ready to begin. Unlike bagels made at bagel shops and bakeries, this recipe begins with a sponge of yeast, flour and water which is fermented for a couple of hours, and is then kneaded together with the remainder of the ingredients, including additional flour, yeast and the malt powder, to create a very thick dough. This dough was so stiff, as a matter of fact, that after about ten minutes in the mixer, I began to worry about my trusty KitchenAid overheating. So I decided to pull the dough out of the mixer and finish kneading it by hand. Little miss was very happy to help me knead, and is even beginning to develop really good form at it!

Once the dough was kneaded, it was divided into balls of equal size and set to rest for about 20 minutes. The recipe specifies the weight for each of the dough balls (four and a half ounces, in case you are curious), but I don't have a kitchen scale, so I eye-balled what looked like it might make a good size bagel, then did my best to divide the dough evenly. I wound up with fourteen dough balls of what I considered to be a good size. These were covered with a damp cloth and allowed to rest.

After the brief rest period, it was time to shape the bagels. The book offered two methods - one involving poking a hole in each ball and the other involving rolling each ball into a snake, wrapping it around your hand and rolling the edges together to form a circle. Guess which method appealed more to the four year old baker in the house? She was intrigued by the concept of poking her thumb through the dough, so that is what we did. Once your thumb creates the guide hole, you carefully stretch and roll the dough to create your basic bagel shape. The shaped dough is placed onto a lightly greased, parchment paper covered baking sheet and left to once again rest for 20-30 minutes, after which they are to be placed into the refrigerator overnight. The recipe offered a very interesting way of testing the dough to determine at what point they are ready to be refrigerated, and that is called the "float test." After resting for the appropriate amount of time, the dough rings will have incorporated enough air that, when placed into a bowl of water, they will float. And amazingly enough, they did! I tested one bagel from each pan, and each floated right away. So all three pans were transferred, loosely covered in plastic wrap, to the refrigerator to allow the flavors to fully develop and await completion in the morning.

The next morning, which happened to be a Sauturday, planned very strategically on my part so that the whole family could take part in the process, we were excited and very ready to turn the shaped dough into actual bagels. The first order of business was to bring a large pot of water to a boil, as bagels are first briefly boiled and then baked in a very hot oven. While the water was coming to a boil, my trusty assistants prepared the toppings for our bagels. Luckily, in our family, we all happen to like everything bagels, so daddy and little miss mixed up sesame seeds, poppy seeds, dried minced garlic and coarse kosher salt to be ready to sprinkle on the bagels after they were boiled.

The process of boiling the bagels was very interesting. Once the water came to a boil, a tablespoon of baking soda was added to the water to add a bit of acidity. In bagel shops, they generally use a lye solution to boil their bagels, so the baking soda added to the water, like the malt powder, adds a bit more authenticity to the flavor of the bagels. I boiled the bagels two at a time (so they would not touch in the pot) for about two minutes per side, the guidelines for making the bagels a bit chewier. The bagels puffed a bit in the water, and began looking more and more like "real" bagels. After their boiling water baths, the bagels were transferred back to the baking sheets where my assistants had the job of topping them with the prepared seed/salt/spice mix. They took their job very seriously and made sure that each bagel was fully covered for maximum flavor.

Once the bagel were boiled and topped, they were placed into a very hot oven - 500 degrees. After five minutes, the pans were rotated and the temperature was dropped to 450 degrees for another five minutes to finish baking. My bagels took a little longer to turn the goldn brown that they were supposed to, but after about three additional minutes, they were ready. And we were excited by what we saw when we took the pans out of the oven. After allowing them to cool for a few minutes, we soon had a delicious breakfast of fresh and totally professional tasting bagels. Little miss had hers spread with peanut butter while daddy and I opted to have one half with butter and the other half with cream cheese. The next morning we had bacon, egg and cheese sandwiches on these bagels for breakfast. However we served them, they were fantastic, and I am really looking forward to making them again. I think I know a few people who are looking forward to eating them again, too.
Related Posts with Thumbnails